Previous Page

Using tor with snowflake
In this setup we will assume you are in a censored country, we will first get tor browser through some alternative sources, and then use snowflake to punch through censorship
In this setup we will assume you are in a censored country, we will first get tor browser through some alternative sources, and then use snowflake to punch through censorship
Before stating anything about snowflake, we need to first get the tor browser bundle.
Tor browser official offers an email address called gettor@torproject.org, which you can send email to them, and they will offer you a download link
First prepare an email, for me I am using protonmail, you can also use outlook or apple email if protonmail is blocked. Any service provider allows you to email tor project will work.

Next simply send an empty email to tor project

Soon you will receive a reply from tor project, simply reply them with your OS name(select one from the list)

For me during this demo is linux64

After the reply they will send you a download link, very ironically the download link is a google drive link, many countries that block tor also block google, they actually are supposed to send the brower bundle in attachment

If you find out google drive does not work for you, try to check whether if github is accessible. Tor browser also provides download on github officially, check the releases on Tor browser github repository

After you get tor browser bundle you should start to use snowflake for connecting to tor network
For a normal tor connection, you will:
1.Talk to central directory
2.Get network information
3.Connect to your gurad nodes, and form tor circuits

If tor network is blocked, you cannot talk to central directory or any tor node ip, then you need a bridge
All of your communication goes through the bridge, including your initial talk to central directory, and your bridge automatically becomes your first tor node

Bridges are usually not publicly announced for censorship resistance, since once a bridge ip get known by censoring firewall it can simply drop all the packets to that ip
This is the weakness for traditional tor bridges, not matter how hard you try to obfuscate your traffic, the bridge ip always have to be semi-public because you want people to use it, but this means people who work for censorship can also find bridge ip
To end this cat and mouse game, snowflake is introduced
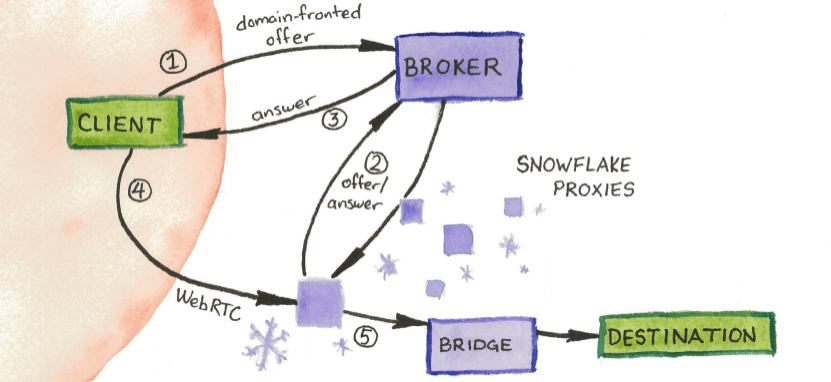
This is a picture of how snowflake works from tor official
First you have volunteers over the world who install snowflake plugin in their browsers, they act as bridges for you to connect to tor network. Because this is mostly run by amateurs, and people turn on and off their devices all the time, which makes many ephemeral bridges, and this is why it is called snowflake
There is also a server called broker that knows all the information about snowflakes

Then you will use a technique called domain fronting, which makes you seems connecting to a legit service like azure cloud or google cloud, but your actual connection goes to the broker.

Then the broker server introduce you to the snowflake proxy, then you establish a webrtc connection, which is a connection allows two app to have direct connection for video call or file transmission. Then your traffic goes to the snowflake proxy, and connects to the rest of tor network

Then you connect to tor network!
End of theory part, now we will use snowflake in tor browser bundle, this is pretty simple
First you unpack the tor browser bundle we downloaded previously and open it

Click configure connection
Scroll down and select "select a built-in bridge"

Choose snowflake and click "connect"

Then make a test connect to https://check.torproject.org to make sure your tor connection works!
At last we are about to setup the torrc file for making tor daemon using snowflake
First install tor and snowflake client
$sudo apt-get install tor snowflake-client -y
Next edit the torrc file, replace the content of /etc/tor/torrc with the following config
UseBridges 1

ClientTransportPlugin snowflake exec /usr/bin/snowflake-client -url https://snowflake-broker.azureedge.net/ -front ajax.aspnetcdn.com -ice stun:stun.l.google.com:19302,stun:stun.antisip.com:3478,stun:stun.bluesip.net:3478,stun:stun.dus.net:3478,stun:stun.epygi.com:3478,stun:stun.sonetel.com:3478,stun:stun.uls.co.za:3478,stun:stun.voipgate.com:3478,stun:stun.voys.nl:3478 utls-imitate=hellorandomizedalpn -log /var/log/tor/snowflake-client.log

Bridge snowflake 192.0.2.3:80 2B280B23E1107BB62ABFC40DDCC8824814F80A72
Then restart tor daemon and check the tor status
$sudo systemctl restart tor@default

$sudo systemctl status tor@default
You should see the log says it connects to a snowflake relay

Finally grab firefox, set proxy to socks5 127.0.0.1:9050, make a visit to https://check.torproject.org to make sure the tor daemon is running correctly

Until there is Nothing left.
Creative Commons Zero: No Rights Reserved
Donate XMR: 8AUYjhQeG3D5aodJDtqG499N5jXXM71gYKD8LgSsFB9BUV1o7muLv3DXHoydRTK4SZaaUBq4EAUqpZHLrX2VZLH71Jrd9k8
Contact: nihilist@contact.nowhere.moe (PGP)