---
author: nihilist
date: 2025-05-24
gitea_url: "http://git.nowherejezfoltodf4jiyl6r56jnzintap5vyjlia7fkirfsnfizflqd.onion/nihilist/blog-contributions/issues/93"
xmr: 8AUYjhQeG3D5aodJDtqG499N5jXXM71gYKD8LgSsFB9BUV1o7muLv3DXHoydRTK4SZaaUBq4EAUqpZHLrX2VZLH71Jrd9k8
tags:
- Core Tutorial
---
# Anonymous VM Setup - Whonix QEMU VMs

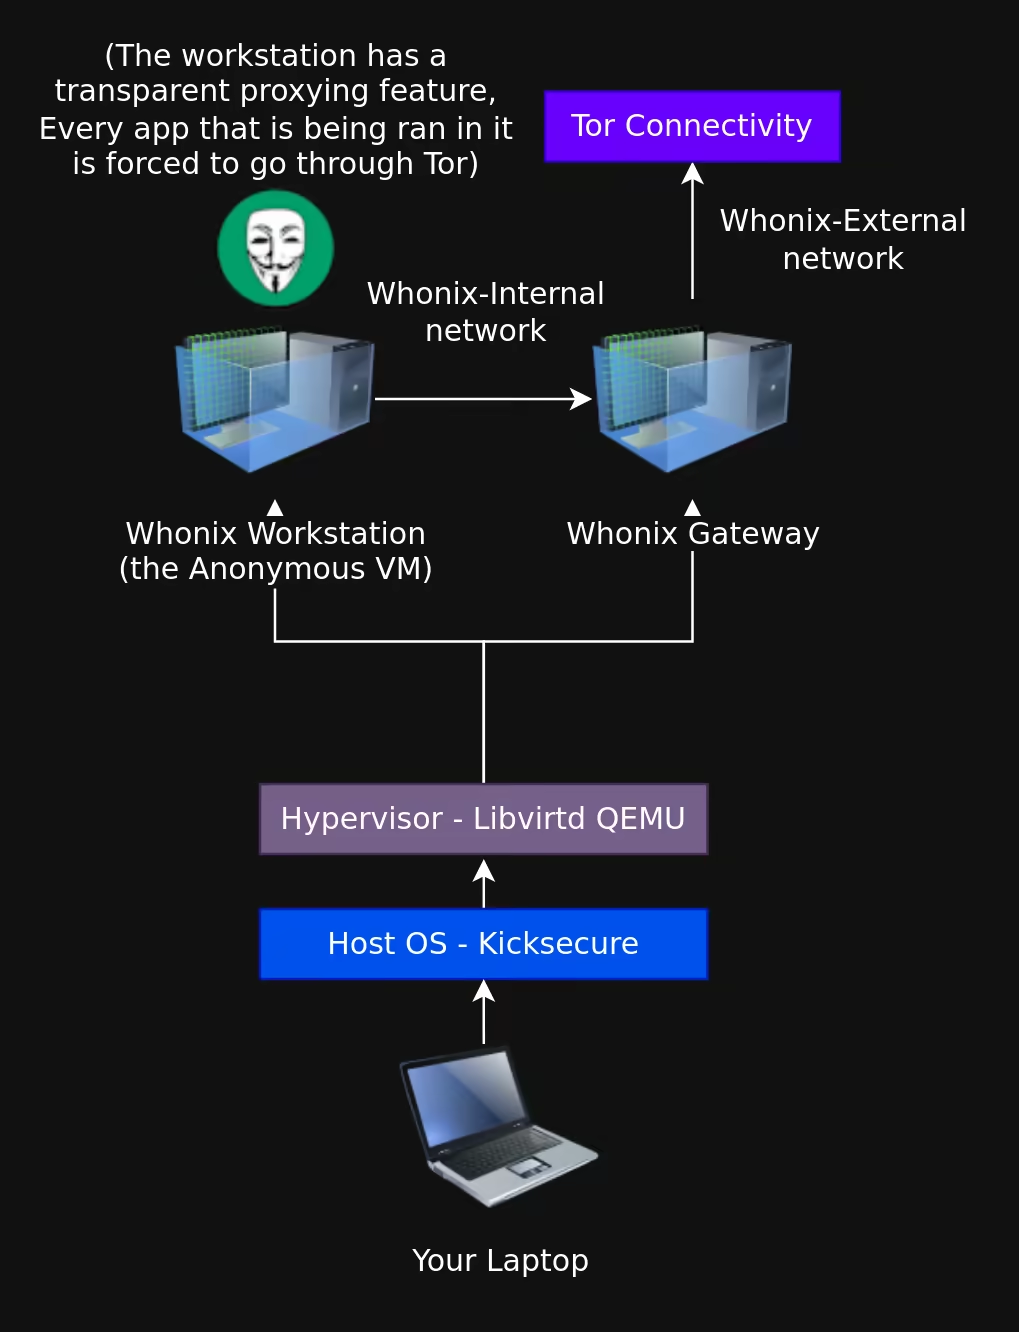
Whonix is an open-source set of 2 VMs (one being used for networking, and the other being used as a workstation) based on a hardened debian 12 OS, made specifically for general anonymous activities, which has been built with hardening in mind. In this tutorial we're going to set it up using the [QEMU virtualization](../hypervisorsetup/index.md) setup we installed previously.
Whonix transparently routes all TCP and DNS data through Tor ([DNS over Tor](../dnscrypt/index.md)) to prevent data leaks.
## _OPSEC Recommendations:_
1. Hardware : (Personal Computer / Laptop)
2. Host OS: [Linux](../linux/index.md)
3. Hypervisor: [libvirtd QEMU/KVM](../hypervisorsetup/index.md)
4. Application: [Host-based VPN](../index.md) (if your ISP doesn't allow Tor traffic)
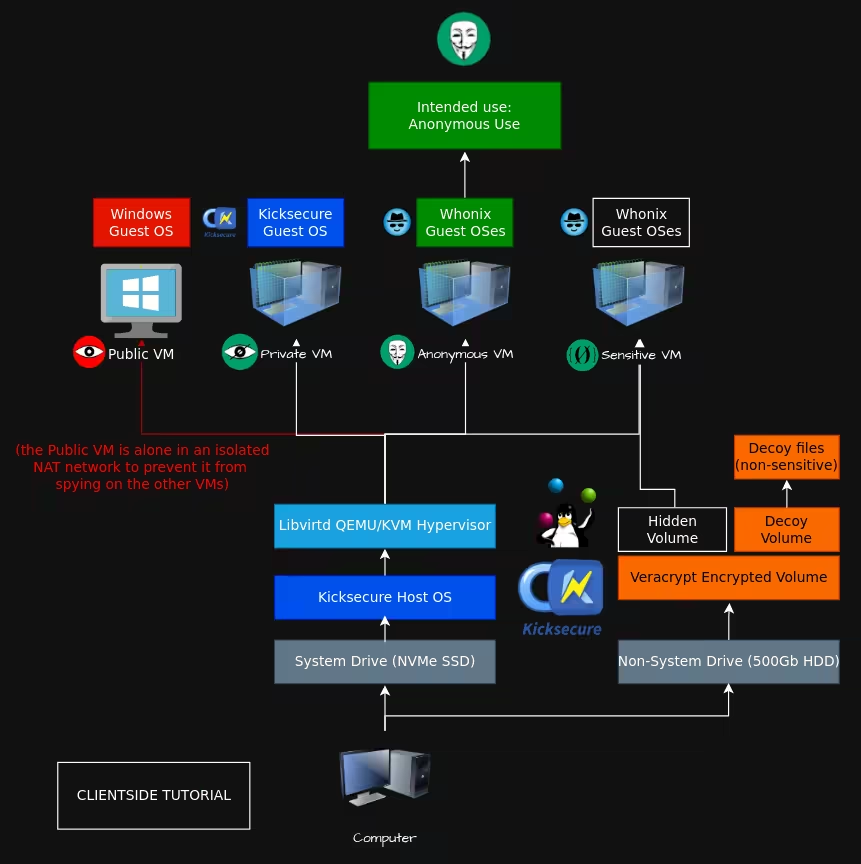
I recommend using this setup into one of the above mentioned VMs, for [Anonymous use](../anonymityexplained/index.md), as per the [4 basic OPSEC levels](../opsec4levels/index.md).
_Sidenote:_ If your ISP does not allow Tor traffic, make sure that you [route the QEMU VMs traffic through a VPN](../vpnqemu/index.md), to hide the tor traffic from your ISP (You -> VPN -> Tor) Setup
## **Initial Setup**
Make sure that you have setup the QEMU / virt-viewer setup we described in [this](../hypervisorsetup/index.md) earlier tutorial
Then install download the whonix VMS as follows:
First go [here](https://www.whonix.org/wiki/KVM) to download whonix for qemu,

Then extract the .xz file where you want the image to be at:
[ 10.8.0.3/24 ] [ nowhere ] [~/Downloads]
→ mv Whonix-XFCE-17.0.3.0.Intel_AMD64.qcow2.libvirt.xz /mnt/VAULT/VMs/
[ 10.8.0.3/24 ] [ nowhere ] [~/Downloads]
→ cd /mnt/VAULT/VMs/
[ 10.8.0.3/24 ] [ nowhere ] [VAULT/VMs]
→ tar -xvf Whonix-XFCE-17.0.3.0.Intel_AMD64.qcow2.libvirt.xz
WHONIX_BINARY_LICENSE_AGREEMENT
WHONIX_DISCLAIMER
Whonix-Gateway-XFCE-17.0.3.0.xml
Whonix-Workstation-XFCE-17.0.3.0.xml
Whonix_external_network-17.0.3.0.xml
Whonix_internal_network-17.0.3.0.xml
Whonix-Gateway-XFCE-17.0.3.0.Intel_AMD64.qcow2
[ 10.8.0.3/24 ] [ nowhere ] [VAULT/VMs]
→ touch WHONIX_BINARY_LICENSE_AGREEMENT_accepted
[ 10.8.0.3/24 ] [ nowhere ] [VAULT/VMs]
→ ls -lash
total 7.9G
4.0K drwxr-xr-x 2 nothing nothing 4.0K Dec 29 20:10 .
4.0K drwxr-xr-x 4 nothing nothing 4.0K Dec 29 20:09 ..
40K -rw-r--r-- 1 nothing nothing 39K Oct 21 2015 WHONIX_BINARY_LICENSE_AGREEMENT
0 -rw-r--r-- 1 nothing nothing 0 Dec 29 20:10 WHONIX_BINARY_LICENSE_AGREEMENT_accepted
8.0K -rw-r--r-- 1 nothing nothing 4.1K Oct 21 2015 WHONIX_DISCLAIMER
4.0K -rw-r--r-- 1 nothing nothing 172 Oct 21 2015 Whonix_external_network-17.0.3.0.xml
2.7G -rw-r--r-- 1 nothing nothing 101G Oct 21 2015 Whonix-Gateway-XFCE-17.0.3.0.Intel_AMD64.qcow2
4.0K -rw-r--r-- 1 nothing nothing 2.3K Oct 21 2015 Whonix-Gateway-XFCE-17.0.3.0.xml
4.0K -rw-r--r-- 1 nothing nothing 97 Oct 21 2015 Whonix_internal_network-17.0.3.0.xml
3.8G -rw-r--r-- 1 nothing nothing 101G Oct 21 2015 Whonix-Workstation-XFCE-17.0.3.0.Intel_AMD64.qcow2
4.0K -rw-r--r-- 1 nothing nothing 2.3K Oct 21 2015 Whonix-Workstation-XFCE-17.0.3.0.xml
1.4G -rw-r--r-- 1 nothing nothing 1.4G Dec 29 20:06 Whonix-XFCE-17.0.3.0.Intel_AMD64.qcow2.libvirt.xz
To simplify the use of the XML files i recommend renaming them like so:
[nihilist@nowhere VMs]$ mv Whonix-Workstation-XFCE-17.0.3.0.xml Whonix-Workstation.xml
[nihilist@nowhere VMs]$ mv Whonix-Workstation.qcow2 Whonix-Workstation.qcow2
[nihilist@nowhere VMs]$ mv Whonix-Gateway-XFCE-17.0.3.0.xml Whonix-Gateway.xml
[nihilist@nowhere VMs]$ mv Whonix-Gateway.qcow2 Whonix-Gateway.qcow2
So now we have the qcow2 files, so we can proceed following the instructions:
[ 10.0.2.2/24 ] [ nowhere ] [VAULT/VMs]
→ vim Whonix-Gateway.xml
[ 10.0.2.2/24 ] [ nowhere ] [VAULT/VMs]
→ cat Whonix-Gateway-XFCE-17.0.3.0.xml | grep VAULT
[ 10.0.2.2/24 ] [ nowhere ] [VAULT/VMs]
→ vim Whonix-Workstation.xml
[ 10.0.2.2/24 ] [ nowhere ] [VAULT/VMs]
→ cat Whonix-Workstation.xml | grep VAULT
With those edits, the Whonix VMs are ready to be used:
[ 10.8.0.3/24 ] [ nowhere ] [VAULT/VMs]
→ sudo virsh -c qemu:///system net-define Whonix_external*.xml
[sudo] password for nothing:
Network Whonix-External defined from Whonix_external_network-17.0.3.0.xml
[ 10.8.0.3/24 ] [ nowhere ] [VAULT/VMs]
→ sudo virsh -c qemu:///system net-define Whonix_internal*.xml
Network Whonix-Internal defined from Whonix_internal_network-17.0.3.0.xml
[ 10.8.0.3/24 ] [ nowhere ] [VAULT/VMs]
→ sudo virsh -c qemu:///system net-autostart Whonix-External
Network Whonix-External marked as autostarted
[ 10.8.0.3/24 ] [ nowhere ] [VAULT/VMs]
→ sudo virsh -c qemu:///system net-start Whonix-External
Network Whonix-External started
[ 10.8.0.3/24 ] [ nowhere ] [VAULT/VMs]
→ sudo virsh -c qemu:///system net-autostart Whonix-Internal
Network Whonix-Internal marked as autostarted
[ 10.8.0.3/24 ] [ nowhere ] [VAULT/VMs]
→ sudo virsh -c qemu:///system net-start Whonix-Internal
Network Whonix-Internal started
[ 10.8.0.3/24 ] [ nowhere ] [VAULT/VMs]
→ sudo virsh -c qemu:///system define Whonix-Gateway*.xml
Domain 'Whonix-Gateway' defined from Whonix-Gateway-XFCE-17.0.3.0.xml
[ 10.8.0.3/24 ] [ nowhere ] [VAULT/VMs]
→ sudo virsh -c qemu:///system define Whonix-Workstation*.xml
Domain 'Whonix-Workstation' defined from Whonix-Workstation-XFCE-17.0.3.0.xml
make sure you give them 4gb of RAM before launching them, then launch them:
[nihilist@nowhere VMs]$ cat Whonix-Gateway.xml | grep GB
22
[nihilist@nowhere VMs]$ cat Whonix-Workstation.xml | grep GB
88
If you're like me and you don't want to run those commands to add the VMs into virt-manager, you can automate it with a simple bashscript like so:
[nihilist@nowhere VMs]$ cat refreshvms.sh
#!/bin/bash
#remove VMs
sudo virsh -c qemu:///system destroy Whonix-Gateway
sudo virsh -c qemu:///system destroy Whonix-Workstation
sudo virsh -c qemu:///system undefine Whonix-Gateway
sudo virsh -c qemu:///system undefine Whonix-Workstation
sudo virsh -c qemu:///system net-destroy Whonix-External
sudo virsh -c qemu:///system net-destroy Whonix-Internal
sudo virsh -c qemu:///system net-undefine Whonix-External
sudo virsh -c qemu:///system net-undefine Whonix-External
echo '[+] VMs removed, re-install them ? (ctrl+c to exit)'
read
#install VMs
sudo virsh -c qemu:///system net-define Whonix_external*.xml
sudo virsh -c qemu:///system net-define Whonix_internal*.xml
sudo virsh -c qemu:///system net-autostart Whonix-External
sudo virsh -c qemu:///system net-start Whonix-External
sudo virsh -c qemu:///system net-autostart Whonix-Internal
sudo virsh -c qemu:///system net-start Whonix-Internal
sudo virsh -c qemu:///system define Whonix-Gateway.xml
sudo virsh -c qemu:///system define Whonix-Workstation.xml
You can run it like so:
[nihilist@nowhere VMs]$ chmod +x refreshvms.sh
[nihilist@nowhere VMs]$ ./refreshvms.sh
[sudo] password for nihilist:
Domain 'Whonix-Gateway' destroyed
Domain 'Whonix-Workstation' destroyed
Domain 'Whonix-Gateway' has been undefined
Domain 'Whonix-Workstation' has been undefined
Network Whonix-External destroyed
Network Whonix-Internal destroyed
Network Whonix-External has been undefined
error: failed to get network 'Whonix-External'
error: Network not found: no network with matching name 'Whonix-External'
[+] VMs removed, re-install them ? (ctrl+c to exit)
Network Whonix-External defined from Whonix_external_network-17.0.3.0.xml
error: Failed to define network from Whonix_internal_network-17.0.3.0.xml
error: operation failed: network 'Whonix-Internal' already exists with uuid 878828d6-fd1f-49ac-9d0c-9c829c414b80
Network Whonix-External marked as autostarted
Network Whonix-External started
Network Whonix-Internal marked as autostarted
Network Whonix-Internal started
Domain 'Whonix-Gateway' defined from Whonix-Gateway.xml
Domain 'Whonix-Workstation' defined from Whonix-Workstation.xml
## **Basic Whonix Usage**
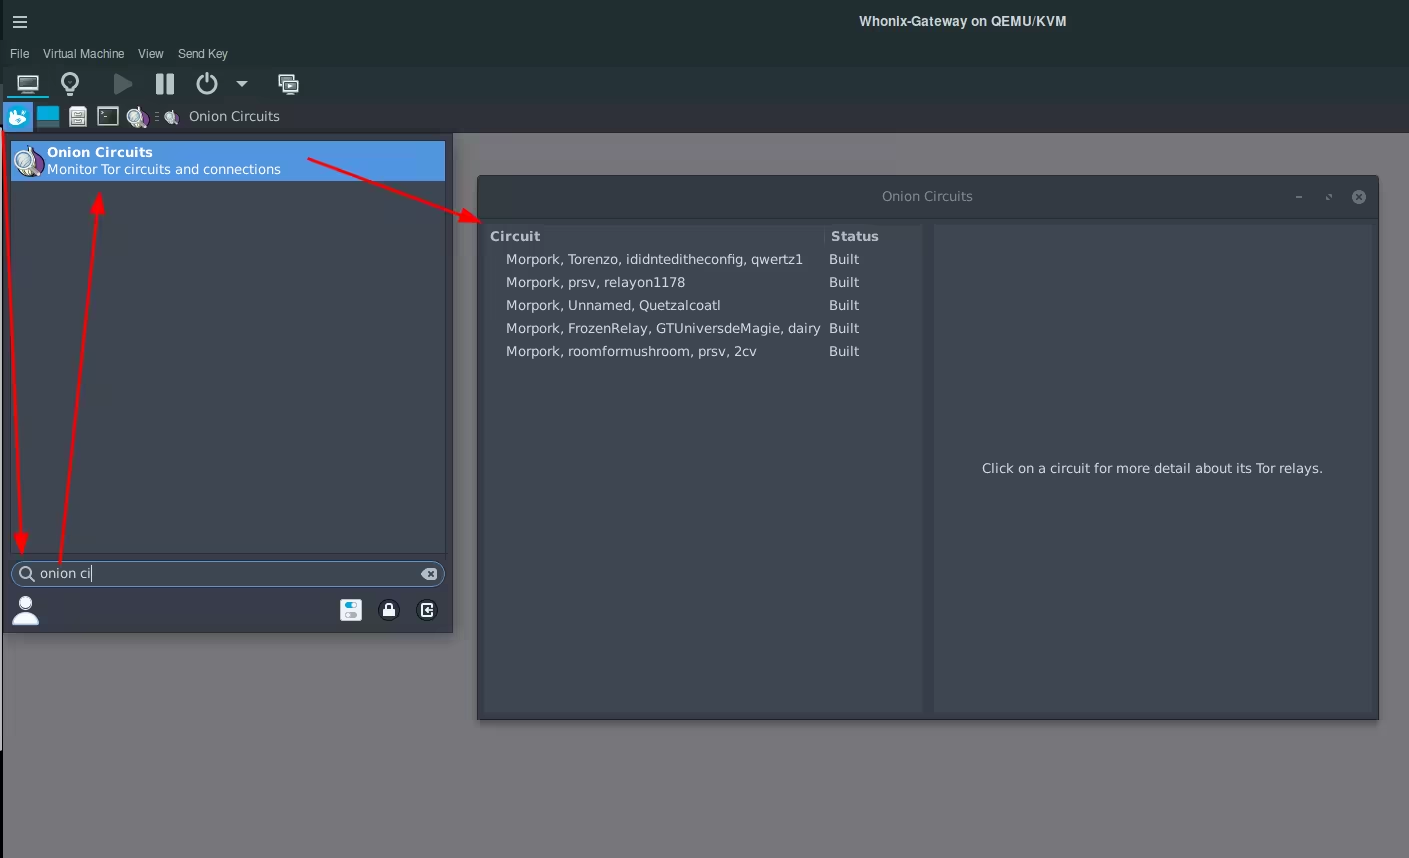
On the Whonix Gateway VM you can open Onion Circuits on the gateway VM to view the tor connections being built up in real time like so :
And inside the Workstation VM you can browse the web using the Tor browser just like in the [previous tutorial](../torbrowsing/index.md):
## Whonix Hardening Features
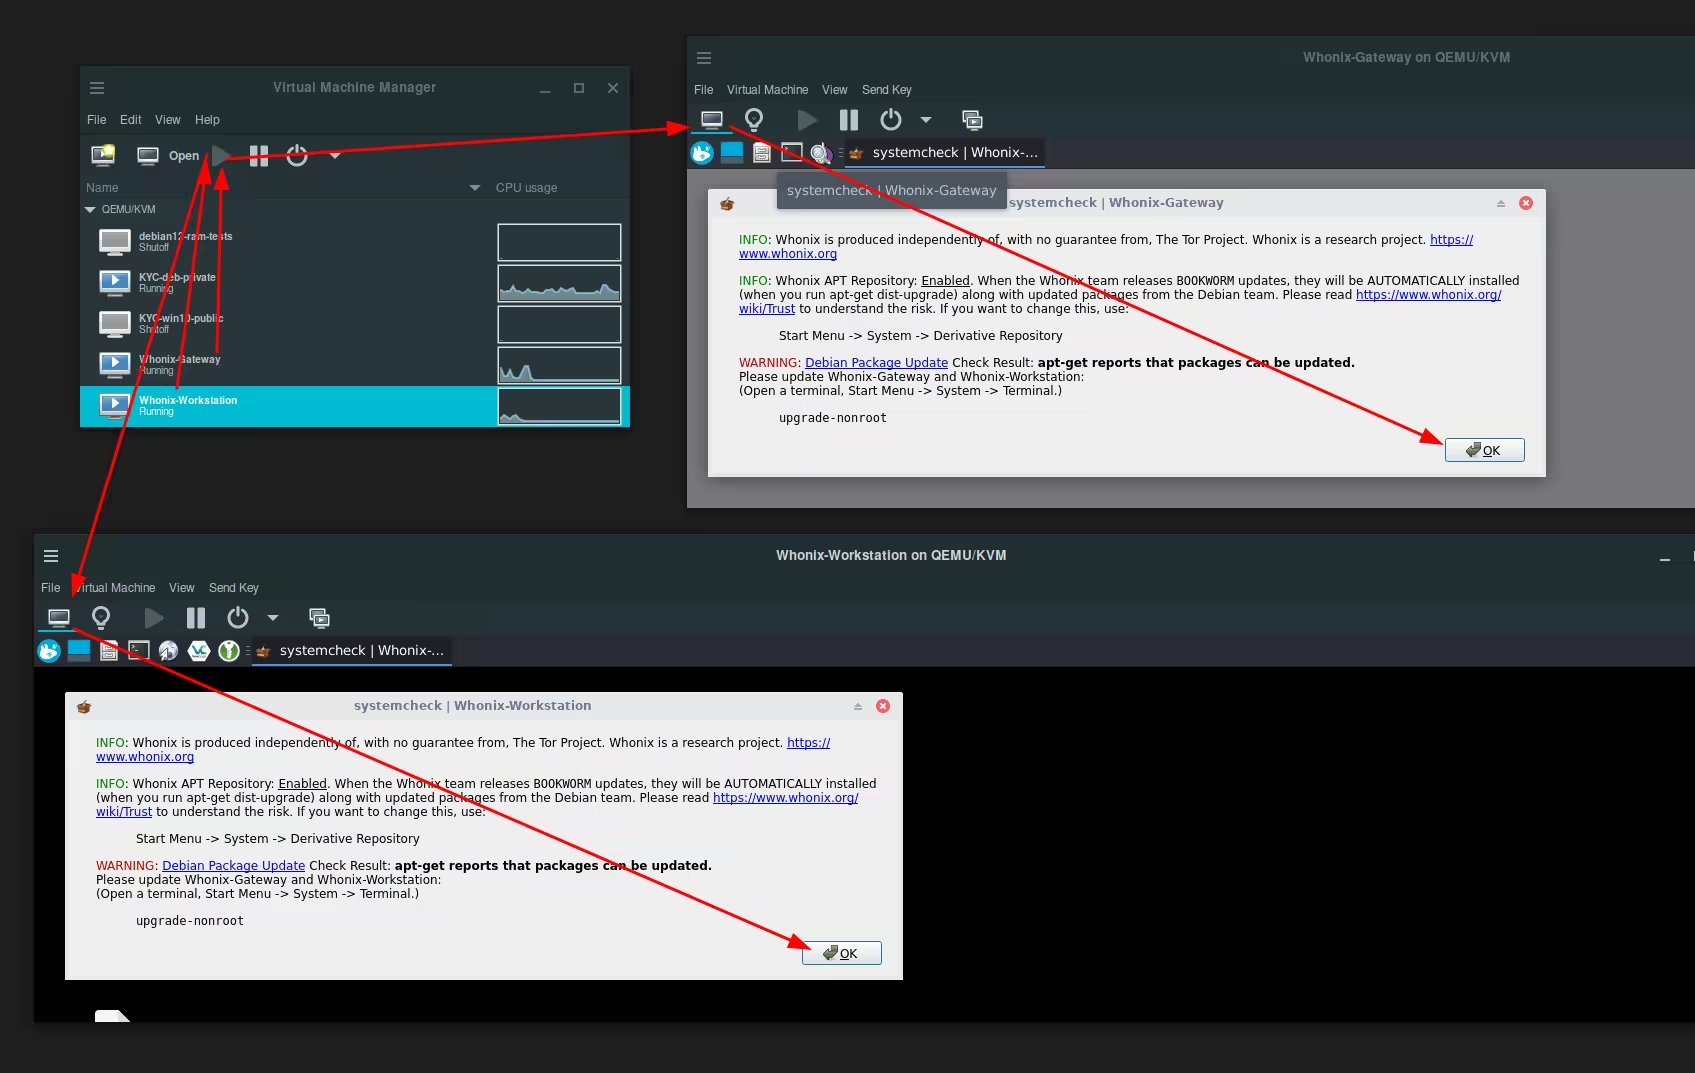
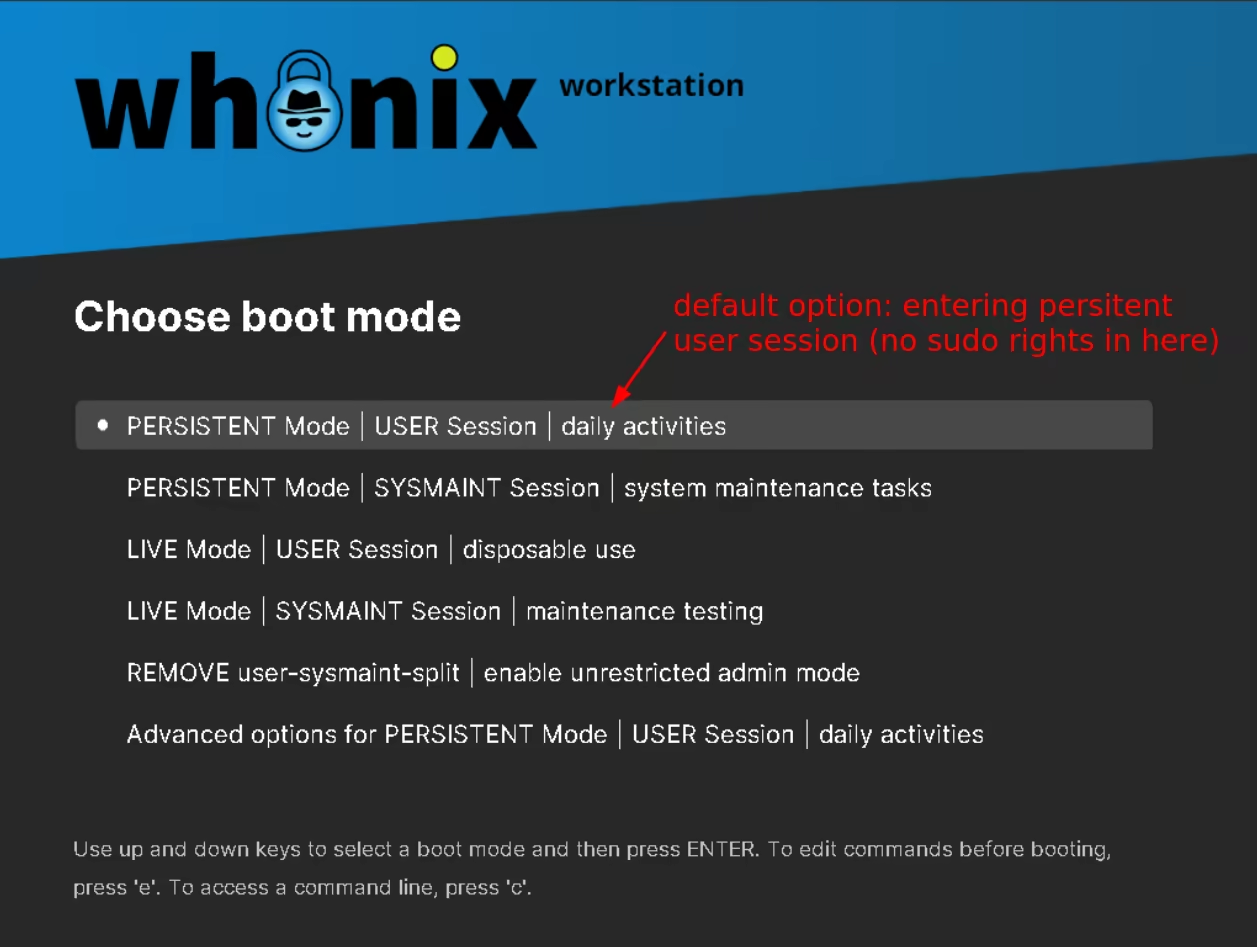
If you try to run sudo commands from inside the user account you'll see that it's not possible, which is intentional, [here's why](https://www.kicksecure.com/wiki/Dev/Strong_Linux_User_Account_Isolation):

To go around that issue you need to reboot the Workstation VM, to boot into persistent mode, into the sysmaint user:
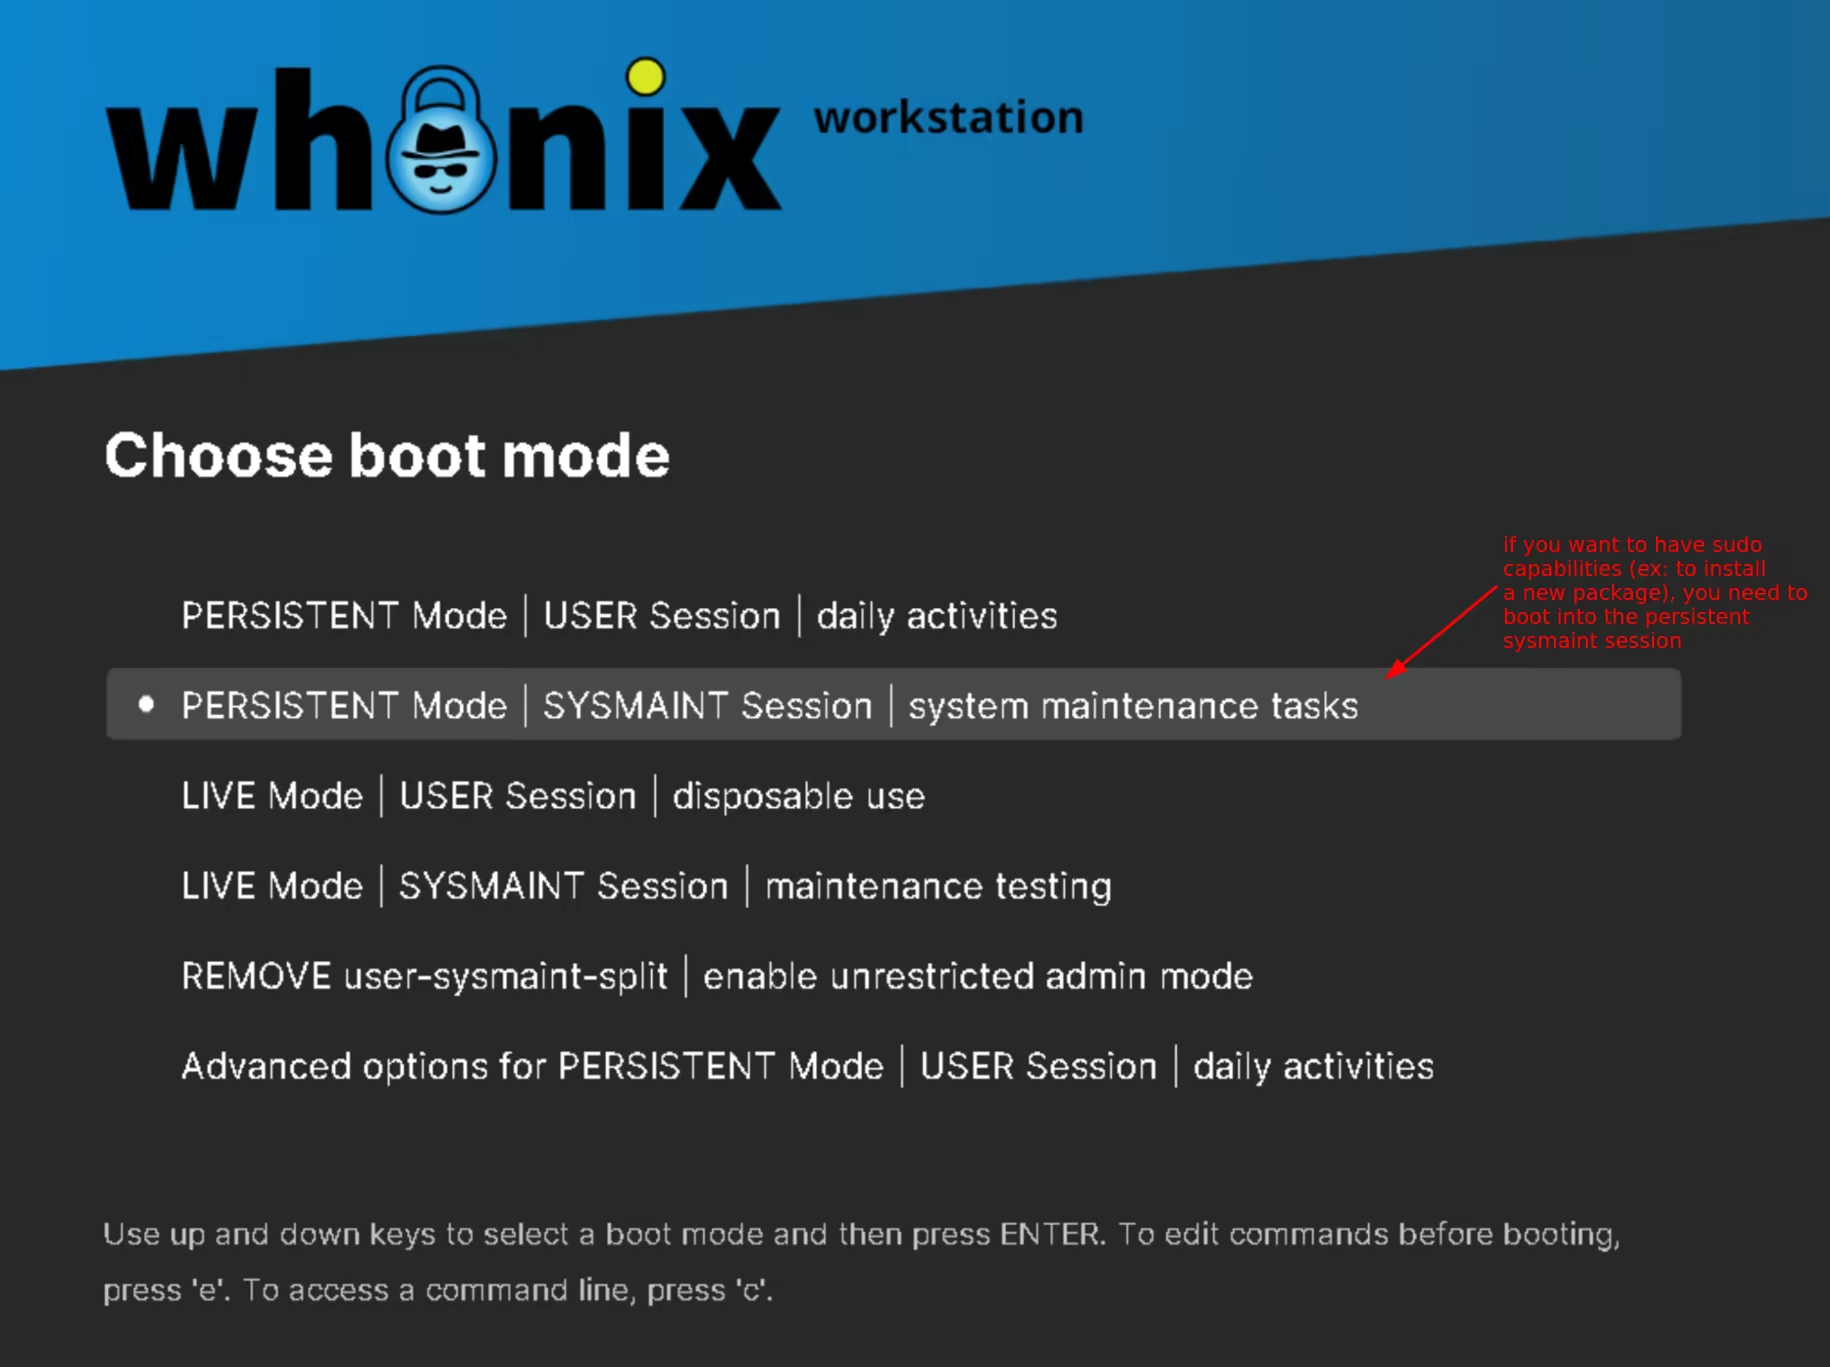
This is where you'll be able to run sudo commands:
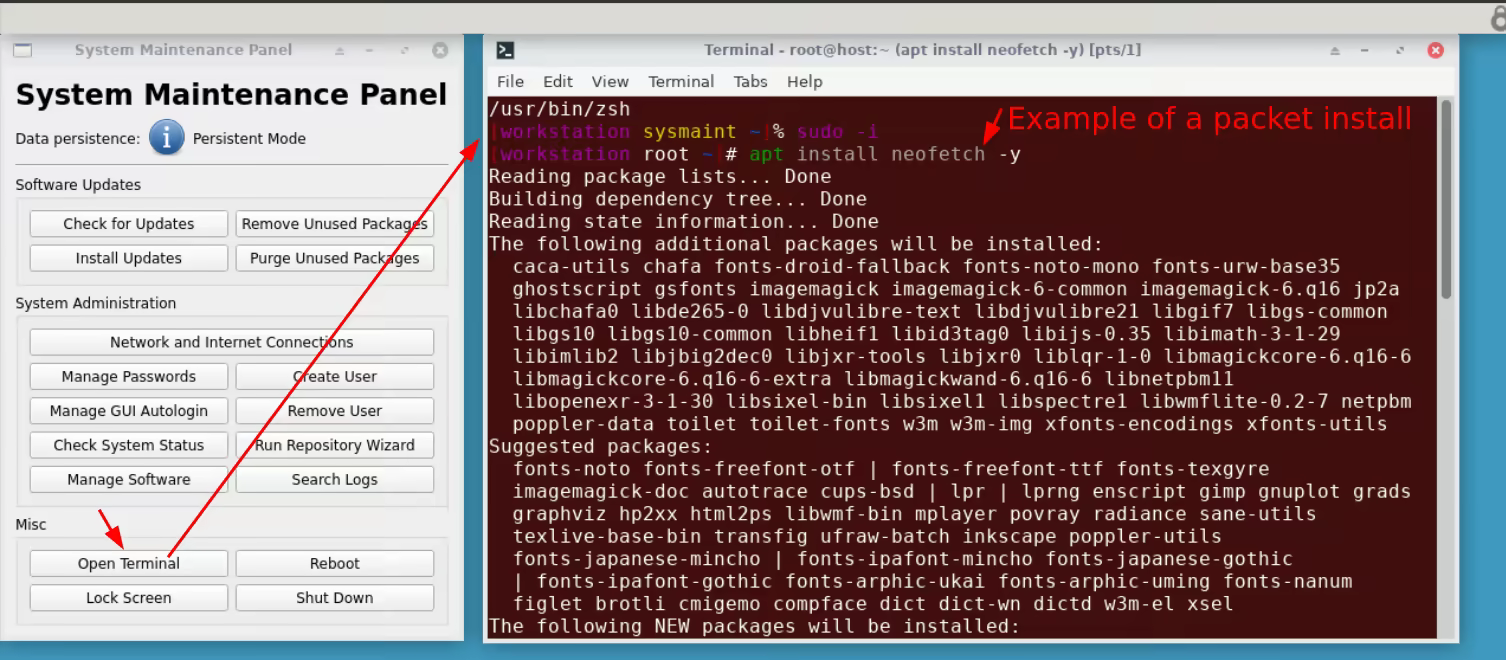
For example we install neofetch to display the system specs:
```sh
[workstation root ~]# reboot now
```
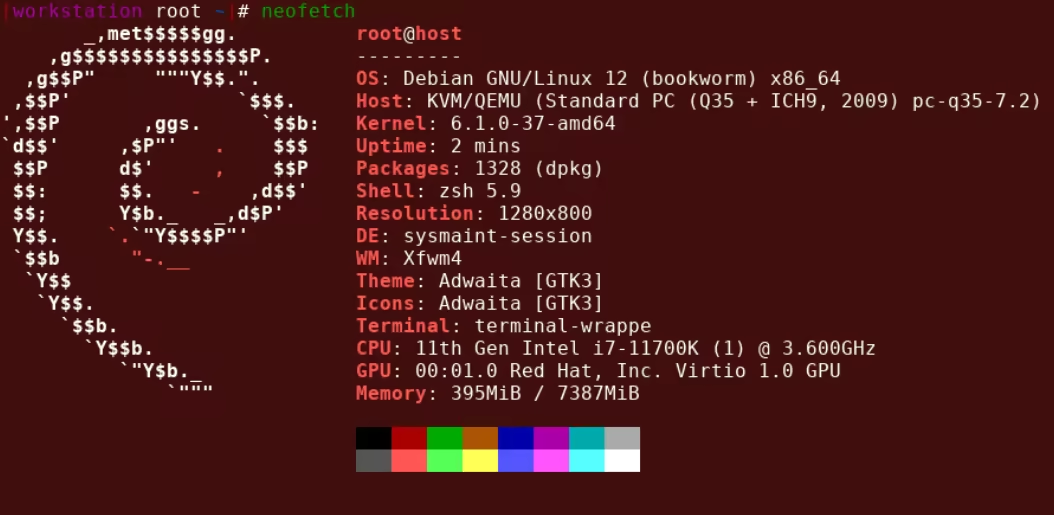
Then, after rebooting into the regular user mode, we see that neofetch is installed as intended:

And thats it! you now have a VM ready to be used for your Anonymous activities,
Now if you want to remove the user and sysmaint separation, you can select the "Remove user-sysmaint-split - enable unrestricted admin mode" boot option like we did in the [Kicksecure Host OS tutorial.](../linux/index.md)