mirror of
http://git.nowherejezfoltodf4jiyl6r56jnzintap5vyjlia7fkirfsnfizflqd.onion/nihilist/opsec-blogposts.git
synced 2025-06-08 00:59:35 +00:00
3 KiB
3 KiB
| author | date | gitea_url | xmr |
|---|---|---|---|
| Anonymous | 2025-01-31 | http://git.nowherejezfoltodf4jiyl6r56jnzintap5vyjlia7fkirfsnfizflqd.onion/nihilist/blog-contributions/issues/260 | 8AUYjhQeG3D5aodJDtqG499N5jXXM71gYKD8LgSsFB9BUV1o7muLv3DXHoydRTK4SZaaUBq4EAUqpZHLrX2VZLH71Jrd9k8 |
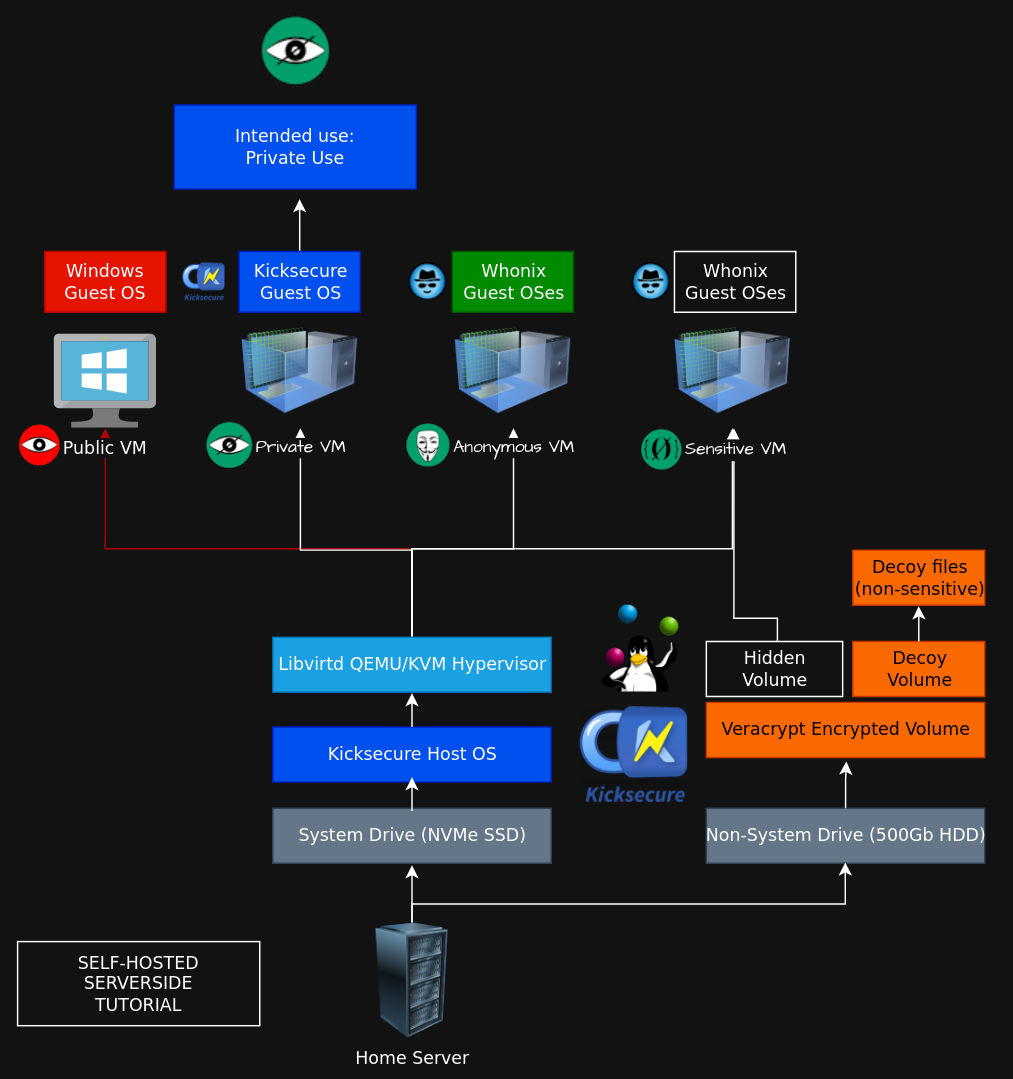
Setting up a QEMU/KVM Hypervisor on your home server
Sidenote: this setup depends on the previous setup we showcased in this tutorial as we need the homeserver to have the host OS setup, with both SSH and RDP access.
Setting up libvirtd QEMU/KVM on the host OS
Via SSH we connect to the homeserver to setup the libvirtd QEMU hypervisor, in order to be able to virtualize machines and segment the intended uses accordingly, just like on the clientside.
[ localhost ] [ /dev/pts/5 ] [~]
→ ssh wonderland
Enter passphrase for key '/home/user/.ssh/torified':
Linux wonderland 6.1.0-37-amd64 #1 SMP PREEMPT_DYNAMIC Debian 6.1.140-1 (2025-05-22) x86_64
Welcome to Kicksecure (TM)!
https://www.kicksecure.com

Kicksecure Copyright (C) 2012 - 2025 ENCRYPTED SUPPORT LLC
Kicksecure is Freedom Software, and you are welcome to redistribute it under
certain conditions; type "kicksecure-license" <enter> for details.
Kicksecure is a compilation of software packages, each under its own copyright and
license. The exact license terms for each program are described in the
individual files in /usr/share/doc/*/copyright.

Kicksecure GNU/Linux comes with ABSOLUTELY NO WARRANTY, to the extent
permitted by applicable law; for details type "kicksecure-disclaimer" <enter>.

Kicksecure is a derivative of Debian GNU/Linux.

Kicksecure is a research project.

default user account: user
default password: No password required. (Passwordless login.)

Type: "kicksecure" <enter> for help.
Web console: https://wonderland:9090/ or https://10.145.64.173:9090/

Last login: Fri May 30 15:19:00 2025 from 192.168.1.67

[ Wonderland ] [ /dev/pts/4 ] [~]
→ sudo -i
From there we can install the following packages to setup the hypervisor:
[user ~]%:~# sudo apt install libvirt0 virt-manager dnsmasq bridge-utils

sudo systemctl enable --now libvirtd
sudo systemctl disable --now dnsmasq

[user ~]%:~# sudo usermod -a -G libvirt user
[user ~]%:~# sudo usermod -a -G kvm user

[user ~]%:~# sudo vim /etc/libvirt/libvirtd.conf

unix_sock_group = "libvirt"
unix_sock_rw_perms = "0770"

:wq

[user ~]%:~# sudo vim /etc/libvirt/qemu.conf

group = "libvirt"
user = "user"

:wq

[user ~]%:~# systemctl restart libvirtd.service

[user ~]%:~# virt-manager

[user ~]%:~$ mkdir ISOs
[user ~]%:~$ mkdir VMs

[user ~]%:~$ sudo chmod 770 -R VMs
[user ~]%:~$ sudo chmod 770 -R ISOs

[user ~]%:~$ sudo chown user:libvirt -R VMs
[user ~]%:~$ sudo chown user:libvirt -R ISOs